Wednesday, October 19, 2011

OSC Access: Build OSC into Ruby objects

I've created a Ruby library called OSC Access for binding OSC directly into Ruby classes and objects.

It conveniently wraps a lot of functionality from osc-ruby, handling server/client sharing and management as well as other tasks commonly associated with OSC.

gem install osc-access

All of OSC Access' functionality is available by including the OSCAccessible module into a class. The module gives you a lot of functionality but you'll want to know about these three methods in particular to get up and running


osc_receive

All OSC input is handled by using the osc_receive method. Here's an example of using osc_receive in a simple way:

class Instrument

  include OSCAccessible

  osc_receive("/1/fader1") do |instance, val|
    instance.velocity = val
  end

  def velocity=(val)
    puts "setting velocity to #{val}"
    ...
  end

end

i = Instrument.new
i.osc_start(:input_port => 8000).join

When this example is run, the method velocity= is called on all instances of the Instrument class whenever OSC messages for the address /1/fader1 are received.

A couple of things to note here...

In order to enable OSC input, an input port must be specified for each instance. I've done that in this example using the osc_start method but there is also a method osc_input which just takes a port number. You can also add multiple input ports and share ports across various objects. (see example...)

Another thing to note is that val is, by default, the value of the first argument of the received OSC message. (OSC messages can have an unlimited number of arguments). You can modify which arg is used, or pass in all of them, by setting the :arg option on osc_receive.

You can also use osc_receive as an instance method. (see example...) However, more usefully, you can create a Hash map spec of osc_receive calls and pass it to an instance like this:

map = {
  "/1/fader1" => { 
    :translate => { :remote => 0..1, :local => 0..127 }
    :action => Proc.new { |instance, val| instance.pitch = val }
  }
}

class Instrument

  include OSCAccessible

  def pitch=(val)
    puts "setting pitch to #{val}"
    ...
  end

end

i = Instrument.new
i.osc_start(:map => map, :input_port => 8000).join

This kind of approach gives you more flexibility by decoupling the OSC spec for your object from the class -- like a controller and model in MVC.

Osc_receive has a few options:

:translate

There's another difference between those two examples: the :translate option means that val will be translated from a number between 0 to 1 to the analogous value between 0 and 127 before being passed to the code block. So for example if the first argument of the received OSC message is equal to 0.5, val will be equal to 63.

:thru

By setting the :thru option to true, any messages that are received for /1/fader1 are sent immediately to the output (as well as calling the :action block). For example, using the Instrument class from the last example:

map = {
  "/1/fader1" => { 
    :thru => true
    :translate => { :remote => 0..1, :local => 0..127 }
    :action => Proc.new { |instance, val| instance.pitch = val }
  }
}

i = Instrument.new
i.osc_start(:map => map, :input_port => 8000, :output => { :host => "192.168.1.9", :port => 9000 }).join

As you can see, I also specified an OSC output host and port for this example. If you're ever missing input or output port or host info, your object simply will not perform IO -- it won't raise any kind of exception.

osc_send

Osc_send gives you the ability to output arbitrary OSC messages. The first argument is the address of the message and any arguments after that are the content. Here is an example of our class definition from this first example with output added

class Instrument

  include OSCAccessible

  osc_receive("/1/fader1") do |instance, val|
    instance.velocity = val
    instance.osc_send("/velocity", val)
  end

  def velocity=(val)
    puts "setting velocity to #{val}"
    ...
  end

end

i = Instrument.new
i.osc_start(:map => map, :input_port => 8000, :output => { :host => "192.168.1.9", :port => 9000 }).join
i.osc_send("/greeting", "hi!")

In this example, I'm sending a message from both osc_receive's action block and in the main program block after i is instantiated.

osc_start

Osc_start starts all of the OSC servers that are connected to your objects. You must call it on an instance before osc_receive will function.

I'll be adding OSC Access to Diamond and coming up with a way to use it with MicroMIDI in the next few days. Thanks for reading.

http://github.com/arirusso/osc-access

Monday, October 3, 2011

Selecting a MIDI Device With Unimidi

There are a couple of recent changes to how MIDI devices can be selected with Unimidi.

Prompting the User

The first is the addition of a handy console prompt that asks the user to select a device and waits for input.  The code looks like this

require "unimidi"

@input = UniMIDI::Input.gets

on my computer, this results in

Select a MIDI input
1) IAC Device
2) Roland UM-2 (1)
3) Roland UM-2 (2)
> 

Note that when the user makes a selection, the device is returned enabled so you don't need to call @input.open on it.

Hard Coded

There's also been some changes to how hard coded selection can be done. As with the user prompt, now you can select and open a device at one fell swoop. Here's a couple of examples which both open the same output. (Device#use and Device#open are the same)

@output = UniMIDI::Output.open(0)
@output = UniMIDI::Output.use(:first)
And of course, you can select and open the device separately if you wish
@input = UniMIDI::Input.all[0].open
@input = UniMIDI::Input.first.open

Thursday, September 29, 2011

A Note About Live Coding in IRB with OSX

Apparently some versions of readline for OSX cause IRB to block thread-passing while it's waiting for user input at the prompt.

If you're experiencing problems live coding in IRB, such as starting the Diamond arpeggiator and nothing happening, it could be because of this. Unfortunately, as far as I know, the only way to fix it is to disable readline. You can do this by adding this line to ~/.irbrc

IRB.conf[:USE_READLINE] = false

This is annoying, because then you'll no longer have the ability to recall previously used commands and things like that. I've been meaning to get text editor based live coding up and running so maybe this is the time

Sunday, September 18, 2011

More MicroMIDI Tricks

MicroMIDI has a few less obvious features that may be useful once you have the basics down.

Sans block

In addition to how I worked in the other examples, MicroMIDI can be used outside of the context of a Ruby block. This allows you to integrate it as a more conventional Ruby library.

Here is the first example from this post redone without a block
@o = UniMIDI::Output.use(:first)

midi = MIDI::IO.new(@o)

midi.note("C")
midi.off 

midi.cc(5, 120)

midi.play("C3", 0.5)
Note that you can also re-open the IO object in a block later using the edit method
midi.edit do 
  play "G3", 1
end
Performance Shortcuts

There are also performance shortcuts that generate messages based on past messages or common conventions.
  • off - this generates a note-off message based on the last note-on message created
  • quiet! - sends note-off messages to all MIDI channels on all outputs
  • repeat - generates a copy of the last message created

Super Sticky Mode

Again in this post, I explained how MicroMIDI uses sticky values. There is also a super sticky mode that allows you to change the values inline with each message you create. Here's an example:
MIDI.using(@o) do

  super_sticky

  channel 1

  note "C4"
  off

  octave 5
  velocity 60

  note "E", :channel => 2
  off

  note "C3"
  off

end

When this program is run, these messages are sent to @o:

* note C4 (channel 1, vel 100)
* note-off C4 (channel 1, vel 100)
* note E5 (channel 2, vel 60)
* note-off E5 (channel 2, vel 60)
* note C3 (channel 2, vel 60)
* note-off C3 (channel 2, vel 60)

As you can see, when I sent :channel => 2 to the second note command, the MIDI channel remained for the commands that followed rather than just being transient for that command.

Message Cache

MicroMIDI keeps a timestamped log of the messages you create. You can access this log using the cache command, like this:
M do
  note "C4"
  cc 5, 120
  play "C2", 3
  
  puts cache
end
This code gives you this output:
{ :message=>#<MIDIMessage::NoteOn:0x007fbb6092baf8 
    @const=#<MIDIMessage::Constant:0x007fbb60930eb8 @key="C4", @value=60>, 
    @status=[9, 0], 
    @data=[60, 100], 
    @channel=0, 
    @note=60, 
    @velocity=100, 
    @name="C4", 
    @verbose_name="Note On: C4">, 
  :timestamp=>2.513885498046875 
}

{ :message=>#<MIDIMessage::ControlChange:0x007fbb60924e10 
    @const=#<MIDIMessage::Constant:0x007fbb6093df00 @key="Portamento Time", @value=5>, 
    @status=[11, 0], 
    @data=[5, 120], 
    @channel=0, @index=5, 
    @value=120, 
    @name="Portamento Time", 
    @verbose_name="Control Change: Portamento Time">, 
  :timestamp=>2.7201175689697266 }

{ :message=>#<MIDIMessage::NoteOn:0x007fbb60921558 
    @const=#<MIDIMessage::Constant:0x007fbb60931f48 @key="C2", @value=36>, 
    @status=[9, 0], 
    @data=[36, 100], 
    @channel=0, 
    @note=36, 
    @velocity=100, 
    @name="C2", 
    @verbose_name="Note On: C2">, 
  :timestamp=>2.961874008178711 
}

{ :message=>#<MIDIMessage::NoteOff:0x007fbb60917c38 
    @const=#<MIDIMessage::Constant:0x007fbb60931f48 @key="C2", @value=36>, 
    @status=[8, 0], 
    @data=[36, 100], 
    @channel=0, 
    @note=36, 
    @velocity=100, 
    @name="C2", 
    @verbose_name="Note Off: C2">, 
  :timestamp=>3003.7591457366943 
}


http://github.com/arirusso/micromidi

Saturday, September 10, 2011

Generating Sysex Messages with MicroMIDI

Recently, the idea of converting MIDI Control Change messages to Sysex on the fly has come up a couple of times. One could use this to control a synth such as a Roland MKS or Yamaha DX7 that only accepts Sysex for control with a regular MIDI knob controller.

The following is a simplified example of doing this with MicroMIDI.
@i = UniMIDI::Input.use(:first)
@o = UniMIDI::Output.use(:first)
  
MIDI.using(@i, @o) do
  
  node :roland, :model_id => 0x42, :device_id => 0x10
  
  *@my_map =
    [0x40, 0x7F, 0x00],   
    [0x41, 0x7F, 0x00],
    [0x42, 0x7F, 0x00]
  
  receive :cc do |message|
      
    command @my_map[message.index - 1], message.value
      
  end
  
  join
  
end
Defining a Node

I won't get into too much background on Sysex but there are two concepts that one must understand in order to generate Sysex with MicroMIDI.

The first concept is what I call a Sysex Node: there are up to three bytes of data used in each Sysex message to identify the synth/module/destination/node/etc where the message is intended to be sent. This is not unlike the MIDI channel in a regular short message except that it's three bytes. Two of those bytes pinpoint the make and model of the synth while the third byte identifies the individual synth (device ID) in case you have multiple Yamaha DX7's or whatever the case.

MicroMIDI allows you to define these bytes as a sticky value using the node function.

Since I'm only using one synth for the entire example, I call the node function before setting up the input event to catch Control Change messages. (If you are using multiple synths and multiple events you would call node in each event block). The arguments represent the Manufacturer ID and the optional Model ID and Device ID. The Manufacturer can be referred to by a symbol (as above) or a string if its name is found in the manufacturer constants in midi.yml (by all means, add yours and do a pull request).

Now here's the annoying part: different brands and synth models use this Node data differently. For instance, I believe some devices don't understand messages with a model ID in them. In those cases just leave out whatever needs to be omitted from your messages. As I learn more about this myself, perhaps I can have this function streamline accepting the proper data for major synth types.

Command vs Request

The other concept to understand is that Sysex messages can (in theory) either be a command or request. This is pretty simple, and if you are creating a controller program you'll deal mostly in commands. In the case of the example above, we send a command
command @my_map[message.index - 1], message.value
When using the command function, the first argument is the sysex address and the second is the value to assign. The value can either be a number, as in this case, or an array of bytes. When making a request, the first argument is also the address but the second argument is the size of the response (in bytes) that you expect to receive
request 0x43, 43
If all else fails...

Due to the fact that Sysex hasn't had a truly concrete spec, some devices will use messages that don't really adhere to the command/request format. In those cases, you can just use the generic sysex command like this
sysex 0x1, 0x2, 0x3, 0x4
With no node specified, this will give you a message composed of
F0 01 02 03 04 F7
In other words, sysex will create a message and not perform any validation or add a checksum to it. You can still use node with these message-- it will append those bytes immediately after the F0 start byte as it would with a command or request.

tldr, Sysex is tricky to to objectify

If you'd like to gain a deeper understanding of how sysex messages work, this is a good tutorial (if Roland-centric) and I often referred back to it while creating MicroMIDI and the libraries that support it.

http://github.com/arirusso/micromidi

Next: More MicroMIDI Tricks

Wednesday, August 31, 2011

MicroMIDI: Shorthand

Most MicroMIDI methods and common symbol arguments have shorthand aliases intended to reduce keystrokes while live coding. The following is the example from the last post, re-done using only shorthand.
@i = UniMIDI::Input.use(:first)
@o = UniMIDI::Output.use(:first)

M(@i, @o) do

  tu :n

  rc :n { |m| tp(m, :oct, 1) if %w{C E G}.include?(m.note_name) }

  j

end

See the alias definitions here for the complete list.

http://github.com/arirusso/micromidi

Next: Generating Sysex Messages

MicroMIDI: Custom Events

While MicroMIDI has built-in functions such as transpose to process MIDI input, these functions may not always suit your purpose musically.

In those situations, you can bind your own input events.

Here is an example similar to the one in the last post except that only the notes C, E, and G are transposed
require "micromidi"

@input = UniMIDI::Input.use(:first)
@output = UniMIDI::Output.use(:first)

MIDI.using(@input, @output) do

  thru_except :note

  receive :note do |message|
    message.octave += 1 if %w{C E G}.include?(message.note_name)
    output message
  end

  join

end

For the sake of expressiveness, there are many permutations of each of these methods. I recommend reading the rdoc for the MicroMIDI Instructions classes to get a handle on what's possible.

http://github.com/arirusso/micromidi

Next: Shorthand with MicroMIDI

MicroMIDI: MIDI Thru and Processing

The simplest way to work with MIDI input in MicroMIDI is to use its built-in shortcuts for MIDI Thru and processor classes.

Here's an example where both kinds of shortcuts are used. An input and output are passed in, all messages that are received by the input are sent to the output (Thru) with the exception of notes which will be transposed up one octave before being sent to the output. The transpose function is an example of a processor.
@i = UniMIDI::Input.use(:first)
@o = UniMIDI::Output.use(:first)

MIDI.using(@i, @o) do

  thru_except :note { |msg| transpose(msg, :octave, 1) }

  join

end

http://github.com/arirusso/micromidi

Next: Custom Events with MicroMIDI

MicroMIDI: MIDI Messages and Output

Here's an example where MicroMIDI sends some MIDI messages to an output. (see an example here which explains selecting an output...)

require "micromidi"

@o = UniMIDI::Output.use(:first)

MIDI.using(@o) do

  note "C"
  off 

  cc 5, 120

  play "C3", 0.5

end 

Running this code sends the following to @o:

* note C2 (2 is the default octave)
* note-off for C2, since that was the last note sent
* sets controller number 5 to 120
* note C3, waits half of a second and then note-off for C3

By default, any time you call a method that returns a MIDI message object, it's automatically sent to any outputs that are passed in. You can toggle this feature by calling

output false

or

output true

You can also prevent only a single command from sending output by setting the output option:

note "c", :output => false
Sticky Values

If you work with MIDI often, you may have noticed that there was no mention of MIDI channel or velocity in the last example. Most of the time, sending a note-on or note-off message requires those values. In addition, for the first message I didn't specify what octave the note C should be.

In MicroMIDI, channel, velocity and octave are sticky values. When you open a MicroMIDI block, those values default to 0, 100 and 2 respectively. These sticky values will be used by any commands that need them. You can also pass a channel or velocity value to a command, temporarily overriding the sticky value. Providing the octave to a note ala note "c4" will override the sticky octave.

Here's an example where the sticky values are used, changed and overriden.

MIDI.using(@o) do

channel 1

  note "C4"
  off

  octave 5
  velocity 60

  note "E", :channel => 2
  off

  channel 3

  note "C3"
  off

end 

What winds up being sent to @o is:

* note C4 (channel 1, vel 100)
* note-off C4 (channel 1, vel 100)
* note E5 (channel 2, vel 60)
* note-off E5 (channel 2, vel 60)
* note C3 (channel 3, vel 60)
* note-off C3 (channel 3, vel 60)

http://github.com/arirusso/micromidi

Next: MIDI Thru and Processing with MicroMIDI

MicroMIDI: a Ruby DSL for MIDI

After a month of moving I'm finally getting back into some music projects. I've got some more flashy things in the works but first here is a Ruby DSL called MicroMIDI that brings all of the MIDI projects mentioned in this post together along with some new tricks in to a package a bit more suited for live coding and one-off scripts.

Being that it's an interface for four libraries, there's a lot of functionality. I break down each concept in the following posts:

http://github.com/arirusso/micromidi

Sunday, July 3, 2011

Live coding with Diamond

I've created a screencast video to show some basic live coding functionality with Diamond. In it, I use Diamond to send MIDI to a 2-voice modular synth and kick drum module.


(sound starts around 55 seconds in)

Here is a quick explanation of what was happening in the video.

Some people prefer to do live coding with a text editor, which is great because you can work a lot faster. However, for the sake of keeping this tutorial to the point, I'll assume you're working in IRB.

First, I'll start up IRB and set up an arpeggiator using the similar options as in the last post. That should look something like this:
require "diamond"

@output = UniMIDI::Output.use(:first)

arp = Diamond::Arpeggiator.new(175, :interval => 7, :midi => @output, :range => 4, :rate => 8)

chord = ["C3", "G3", "Bb3", "A4"]

arp << chord

arp.start
At that point we start hearing arpeggios. Since the arpeggiator is started in a background thread by default, and I can make changes to it while it plays.
arp.rate = 16
arp.gate = 20
arp.range = 3

# etc

In the video, I use the Arpeggiator#rest_every method to insert musical rests in to the arpeggio sequence. If I do
arp.rest_every(5)
notes become muted on every fifth beat.

Syncing multiple Arpeggiators

Another thing I do in the video is sync multiple arpeggiators to each other.

Assuming I still have that setup running, I'm going to add another arpeggiator.
arp2 = Diamond::Arpeggiator.new(138, :rate => 2, :output_channel => 1)

arp2 << ["C3", "G4", "A4"]
Because I used the :output_channel => 1 option, any notes coming from arp2 will be outputted on MIDI channel 1. Now I can sync this new arpeggiator to the old one -- the clock of the first arpeggiator, arp will drive arp2.
arp.sync(arp2)
By default, the sync will wait for the next time the arpeggiator pattern repeats to take hold. You can override this by passing in :now => true which will activate the sync on the next downbeat.
arp.sync(arp2, :now => true)
You can sync as many arpeggiators as you like.

Trouble getting this working in OSX? One solution here.

Thanks for reading


http://github.com/arirusso/diamond

Diamond, MIDI Arpeggiator in Ruby


Diamond is a MIDI arpeggiator in Ruby.

It features all of the classic functions of a MIDI arpeggiator plus the ability to live code, algorithmically generate and modify patterns, chain and sync instances and more


This is a quick screencast video I did while live coding Diamond. (read more about this here...)
(Sounds starts around 55 seconds in)

Getting started

Ruby 1.9.2 or JRuby in 1.9 mode are required.

It installs with a typical gem installation...
gem install diamond
Here is a very basic example to get started:
require "diamond"
First, select a MIDI output using unimidi. (more...)
@output = UniMIDI::Output.gets
The Arpeggiator has a number of optional parameters (more...). For the sake of keeping this demo simple, here is a straightforward setup:
opts = { 
  :gate => 90, 
  :range => 4, 
  :interval => 7,
  :midi => @output,
  :pattern => Diamond::Pattern["UpDown"],    
  :rate => 8
}
(read more about what these options mean)

Now create an Arpeggiator object, passing in a tempo value and the options chosen before. In this case the tempo will be 138 BPM
arp = Diamond::Arpeggiator.new(138, opts)
Of course, an Arpeggiator needs notes to work with. As you might expect, it's easy to use a MIDI input for that (see example). However, again for the sake of simplicity here's a chord in Ruby
chord = ["C3", "G3", "Bb3", "A4"]
Use Arpeggiator#add and Arpeggiator#remove to change the notes that the arpeggiator sees. (Arpeggiator#<< is the same as add)
arp.add(chord)
arp.add("C5")
arp << "A4"
By default, the arpeggiator will run in a background thread so if you are working in IRB this will allow you to live code, sync it other arpeggiators, or just run another foreground process. (To start in the foreground, just pass :focus => true to Arpeggiator#start)
arp.start
At that point, the arpeggiator starts playing. All of its options can be controlled on the on the fly.
arp.rate = 16
arp.gate = 20
arp.remove("C5", "A4")
Here are examples showing how to use some of Diamond's other features
Thanks for reading
http://github.com/arirusso/diamond

Monday, June 27, 2011

High-level realtime MIDI IO with Ruby

Update (9/8/2011): I've created another library that wraps all of the concepts of this post in a Ruby DSL and adds shorthand notation and some other fun things. Read about MicroMIDI here


Understandably, a few people have asked me for advice on how to input and output MIDI in a human friendly way with unimidi so I've decided to put together a quick tutorial. I'll be focusing on two gem libraries that I wrote: midi-message, which deals soley with MIDI message objects, and midi-eye, a library for reacting to MIDI input. Of course, it should be mentioned that there's no one way to do this with unimidi.  You can use whatever MIDI objects you like or create your own classes-- unimidi just deals in raw low-level bytes.  There are other libraries such as midilib that provide an intriguing alternative and could work pretty easily with unimidi.  Or one could get creative and go off with a totally unconventional approach as well. For the examples that follow, I'm using a MIDI input and output that I specify with unimidi.
require 'unimidi'

@input = UniMIDI::Input.use(:first)
@output = UniMIDI::Output.use(:first)

If you copy and paste these, they will just open the first MIDI devices available on your computer. You should determine which MIDI devices you want to use and edit these statements to suit your setup. (here's a blog post that goes into more detail on this)

Dealing with MIDI input using midi-eye

My preferred way of dealing with MIDI input is to react to arriving messages with an event listener.  Midi-eye makes this easy and its constructor accepts a unimidi input to attach to.  Here is an example that will react to all incoming messages in the same way by printing them to the screen

require 'midi-eye'

listener = MIDIEye::Listener.new(@input)
listener.on_message do |event|
  puts event[:timestamp]
  puts event[:message]
end

listener.start
Chances are if you're working with MIDI input that you will want to cherry-pick certain messages, or at least react in a different way depending on what type of message you've received eg. a note message, control change, etc.  To accomplish this, arguments can be passed to the Listener#listen_for method which will match against properties of the incoming messages
listener.listen_for(:class => [MIDIMessage::NoteOn, MIDIMessage::NoteOff]) do |event|

  # raise the note value by an octave
  event[:message].note += 12

  # send the altered note message to the output you chose earlier
  @output.puts(event[:message])

end

listener.start
In this example, I take all note messages (identified by their class), transpose them up one octave and send them to my MIDI output. You can add as many of these callbacks as you like, just keep calling Listener#listen_for. While that type of matching will be useful in a lot of cases, it is limited by the fact that it only matches positively against the properties and values you pass in. If you need more complex matching, I recommend putting a conditional statement within the callback.
listener.listen do |event|

  # is this a note above C3?
  if event[:message].respond_to?(:note) && event[:message].note > 48

    # if so, lower the note value by a fifth
    event[:message].note -= 7

  end

  # and send the message to the unimidi output
  @output.puts(event[:message])

end

listener.start

(listen and listen_for are actually the same method, I just think it looks cleaner to call listen when there is no matching happening)

Threading

Pass :background => true to listener.start to have the listener work only in a background thread. This will allow you to run other listeners or foreground threads while that particular listener is running in the background.

Output MIDI using midi-message

In those examples, I sent messages to an output-- but I didn't create those messages myself. The midi-message library allows you to create messages like that yourself in a flexible way.

require 'midi-message'
include MIDIMessage
Here are three different MIDI note-on messages created using three different methods.
messages = []

messages << NoteOn.new(0, 48, 64) # C3

messages << NoteOn["E3"].new(0, 100)

with(:channel => 0, :velocity => 100) do
  messages << note_on("G3")
end
With those message objects in hand, I pass each to UniMIDI::Output#puts the same way you saw earlier.
messages.each { |message| @output.puts(message) }
That's it... and it works the same for all types of MIDI messages including sysex. You can find some info on creating sysex messages here.

http://github.com/arirusso/midi-eye
http://github.com/arirusso/midi-message
http://github.com/arirusso/unimidi

Thursday, June 9, 2011

OSX: Unimidi, IAC and MIDI Patch Bay

Some quick instructions for routing MIDI between unimidi and other programs in OSX...

OSX (10.3 and above) has the ability built in to route MIDI between programs using something called Inter-Application Communication (IAC). IAC allows you to create a pair of virtual MIDI devices (an input and an output) that applications will see as though they are usual MIDI hardware devices. When you send MIDI instructions to the output, they show up at the input. Therefore, you can send MIDI to the output using one program and use the input in another program to receive the data.

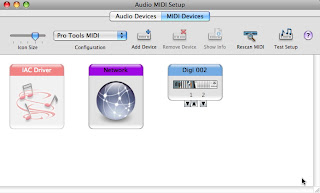
You can control the IAC settings using the built-in Audio MIDI Setup applications in the utilities folder. That program allows you to create, edit and delete these virtual device pairs.


When Audio MIDI Setup is loaded you should see the window shown above. If you don't, select Show MIDI Window from the Window menu.

Double-click the IAC Driver icon. Click More Information if the Ports menu is not showing. Make sure that there is at least one port listed -- this represents a single pair of virtual devices.

When working with Ruby, select the IAC Driver from the list of unimidi inputs or outputs that corresponds to the port that you've created. For example, the first IAC Driver output in unimidi will correspond to the output for the first set of ports in Audio MIDI Setup.

You can list your unimidi devices by using unimidi list at the command line or using UniMIDI::Device.all in Ruby.

Once you have these concepts down, you also have the option of using MIDI Patch Bay for more complex routing and filtering.

Joe Le Brech made a video of using MIDI Patch Bay and IAC to send notes to GarageBand


He wrapped all of his Ruby code in a script called output.rb so you really can't see exactly what's going on the Ruby end of things...but it should give you a general idea of how this works

Tuesday, June 7, 2011

Unimidi: Platform independent realtime MIDI IO in Ruby

Unimidi is a universal Ruby library for realtime MIDI IO.

It currently works with MRI 1.9.2 on Linux, OSX, Windows/cygwin and under JRuby in 1.9 mode on any platform.

gem install unimidi

No compilation is required, install the gem and start playing.

Unimidi deals in raw bytes rather than high level message objects with the intention of allowing people to use whichever message objects or helpers they choose. There's a few libraries out there for that, including one by me.

Under the hood, unimidi is essentially linkage to a set of platform specific C bindings (that use ruby-ffi).  Or in the case of JRuby, some code that wraps javax.sound.   These platform specific libraries are broken out in to their own gems and the appropriate one should install automatically when the unimidi gem is installed. In unusual cases where your platform isn't recognized, all of those gems will be installed.  You can see which library goes with which platform on the unimidi github page. It is possible to use those gems on their own, but currently none of them contain any features that aren't also made available through unimidi.

Here's a couple of quick examples to get started

Sending notes to a MIDI output

First, load unimidi and then define a set of note values and a duration value for how long the notes will be held out.

require 'unimidi'

notes = [36, 40, 43, 48, 52, 55, 60, 64, 67] # C E G arpeggios
duration = 0.1

Next, select an output.  To list all available outputs, you can do unimidi list from the command line or UniMIDI::Device.list in irb.  In this case, the first output is selected and enabled. (here is another post with more information about selecting a device)

output = UniMIDI::Output.open(:first)

Now open that output.  Passing a block to open is optional but it ensures that the device is closed when the program is finished.  This can alleviate some headaches when multitasking MIDI/audio programs.  Note that it's also possible to select, open and use multiple inputs and outputs concurrently.

output.open do |output|

  notes.each do |note|
    output.puts(0x90, note, 100) # note on message
    sleep(duration)  # wait
    output.puts(0x80, note, 100) # note off message
  end

end

Output#puts can also be used for sysex messages in the same manner as note messages, a la:
output.puts(0xF0, 0x41, 0x10, 0x42, 0x12, 0x40, 0x00, 0x7F, 0x00, 0x41, 0xF7)
Note that some OS's will silently reject invalid sysex or short messages.

You can also Output#puts a string of hex bytes if you prefer to work that way
output.puts("904040")
output.puts("F04110421240007F41F7")

Working with input

Input can be collected two ways. First, unimidi has a method Input#gets which waits for input before returning. It works exactly the way Ruby's $stdin.gets works when waiting for keyboard input.

Here is a demonstration of Input#gets

Select an input and open it...

input = UniMIDI::Input.first
input.open do |input|

  $stdout.puts "send some MIDI to your input now..."

  loop do
    m = input.gets
    $stdout.puts(m)
  end

end

When MIDI input is received, you'll see inspected Hash objects like this:

{ :data => [144, 60, 100], :timestamp => 1024 }

In this case [144, 60, 100] is a note-on message for channel 0, note C4 (aka 60), with velocity 100.  The timestamp is the number of milliseconds since the input was opened.

The other more advanced way to receive input is by polling Input#buffer manually.  As new messages are received, they are added to that buffer array.  I normally use this with a pointer to keep track of the index of the last message seen.  Polling this way would for example, allow you to create your own background thread to collect input while your program does other things.  The library Topaz, which I wrote about in my last post, collects clock messages from unimidi that way.

Your computer should be able to receive data with 1-2 millisecond accuracy

http://github.com/arirusso/unimidi

Thursday, May 26, 2011

Topaz: MIDI syncable tempo in Ruby

Topaz is a Ruby based music tempo generator / analyzer 

gem install midi-topaz

It gives you the ability to time events to a given rate in beats per minute
("sequencer" is some kind of imagined sequencer)

@tempo = Topaz::Tempo.new(130) { sequencer.step! }

or synchronize them to incoming MIDI clock messages

@input = UniMIDI::Input.first.open # a midi input

@tempo = Topaz::Tempo.new(@input) { sequencer.step! }

Topaz can also act as a MIDI master clock.  If a MIDI output object is passed to Topaz, MIDI start/stop/clock signals will automatically be sent to that output at the appropriate time

@output = UniMIDI::Output.first.open # a midi output

@tempo = Topaz::Tempo.new(120, :midi => @output) { sequencer.step! }

an input can be used along with multiple outputs simultaneously

@tempo = Topaz::Tempo.new(@input, :midi => [@output1, @output2]) { sequencer.step! }

once everything is all set, start the clock

@tempo.start

Note that if you are syncing to external clock, nothing will happen until Topaz receives a start or clock message

Other stuff to note...

Whether or not you're using an internal or external clock source, the event block will be called at quarter note intervals by default. If you wish to change this, set the option :interval.  In this case, 16th notes will occur at 138 beats per minute where one beat equals one quarter note

@tempo = Topaz::Tempo.new(138, :interval => 16) { sequencer.step! }

View the current tempo, which is calculated by Topaz if you're syncing to an external source.
(this feature is in progress. you might receive some unreliable values - 5/26/2011)

@tempo.tempo
    => 132.422000

Run the generator in a background thread by passing :background => true to Tempo#start

@tempo.start(:background => true)

@tempo.join # join later if you want

Pass a block in that will stop the clock when it evaluates to true

@tempo.stop_when { @i.eql?(20) }

http://github.com/arirusso/topaz

Wednesday, May 25, 2011

bloggins

HELLO

I'm working on some music programming/performance tools that I'm going to post here

My github page has the progress so far

http://github.com/arirusso

I'll be going back and writing about those projects as well as the new stuff as it's ready