Showing posts with label audio. Show all posts

Sunday, October 21, 2012

HTML5 Spectrum Analyzer: In 3d

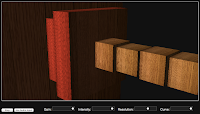
I've created a new 3d version of my HTML5 audio spectrum analyzer using Three.js.


Check it out here

Where it used a d3 bar chart before, the frequency amplitude is now represented in changing the size of some classy wood-paneled 3d cubes.

You can use mouse and scroll over the scene itself to orbit the camera around the cubes.

Like the older version, the default audio is some music I made but you can enter any URL or use live input in Chrome Canary.  All of the other slider controls are the same too.

3d version on Github


Thursday, October 4, 2012

HTML5 Spectrum Analyzer: Live Audio Input

This week, I've added live audio input to the HTML5 spectrum analyzer.

http://d3-spectrum.herokuapp.com

Click the button that says Use audio input and then click Allow when prompted to give your browser access to your computer's audio input.  You can then click Use audio file to switch back to the audio file.

I've also added an intensity control that allows you to juice up the visual intensity without sacrificing volume or accuracy.

Of course, it may not work in your browser:


Is it ever that simple?  At time of writing HTML5 live audio input is only supported in Chrome Canary.  You need to go to about:flags in the URL bar, and then enable Web Audio Input near the bottom of the list

Spectrum Analyzer on github

Monday, October 1, 2012

Quick Project: D3 / HTML5 Web Audio Spectrum Analyzer

For fun this last week I made a spectrum analyzer using D3 and the HTML5 Web Audio API.  Been meaning to check those out for a while, and spectrum analyzer seemed like the natural way to kill two birds.

Here it is running on Heroku with some of my music as the example track

http://d3-spectrum.herokuapp.com

And the github page here:

https://github.com/arirusso/d3-audio-spectrum

Increasing the curve setting gives the spectrum a more logarithmic display, traditionally more common for audio spectrum analyzers.

The other controls are pretty straightforward

Enjoy

Updates:
Adding live audio input in Chrome Canary (10/4/2012)

Wednesday, April 25, 2012

Quick Project #1: Extract Audio Samples From Online Video

As I get ready to move once again (this time to the Ridgewood/Bushwick border) there's not a whole lotta time for personal projects. Yesterday I decided that I would find a quick one and do it no matter how useless it was.

Turned out, I came up with something that's going to be pretty useful (for me). Last week, a coworker pointed me to marcel's awesome Ruby giftube script which extracts animated gifs from online videos. I've been looking to incorporate more audio samples in my music for quite some time, so I forked his script and changed it to extract audio samples instead of gifs, complete with mp3 conversion.

Here's the result:

https://gist.github.com/2473383

Sunday, March 25, 2012

MicroOSC: a Ruby DSL for OSC

Being on my way to the west coast and out of arm's reach of the synths, I've had a few hours to switch gears and put together a quick Ruby gem, MicroOSC. It's a utility and DSL for dealing with OSC messaging.

gem install micro-osc

I applied the same principle to OSC that I applied to MIDI with MicroMIDI: distilling the simplest messenger interface that I could think of.

Unlike MIDI, OSC deals with generic user-defined messages. This eliminates the need for describing different concrete message types, something that added a lot complexity to MicroMIDI.

MicroOSC can function as a server, a client or both. In this example, I'll demonstrate them separately, having the two programs talk to each other over a local network.

Here is a server:

require "osc"

OSC.using(:input_port => 8000) do

  receive("/greeting") { |val| p "received #{val}" }

  p "Ready to receive OSC messages on port(s) #{input_ports.join(', ')}..."

  wait_for_input

end

Once you have this running, you should see "Ready to receive OSC messages..." in your Ruby console. Switch to another window and run this client program:

require "osc"

o = OSC.using(:output => { :host => "localhost", :port => 8000 })
o.out("/greeting", "hullo!")

After running it, flip back to your server program and see “received hullo!”, confirming that your two programs were in fact talking to each other!

Notice that in the second program I didn't use a Ruby block style. Doing it this way would generally be better for live coding, and probably some other scenarios as well.

That's it!

Look for another post with real-world examples, advanced techniques and combining with MicroMIDI soon.

http://github.com/arirusso/micro-osc

Wednesday, October 19, 2011

OSC Access: Build OSC into Ruby objects

I've created a Ruby library called OSC Access for binding OSC directly into Ruby classes and objects.

It conveniently wraps a lot of functionality from osc-ruby, handling server/client sharing and management as well as other tasks commonly associated with OSC.

gem install osc-access

All of OSC Access' functionality is available by including the OSCAccessible module into a class. The module gives you a lot of functionality but you'll want to know about these three methods in particular to get up and running


osc_receive

All OSC input is handled by using the osc_receive method. Here's an example of using osc_receive in a simple way:

class Instrument

  include OSCAccessible

  osc_receive("/1/fader1") do |instance, val|
    instance.velocity = val
  end

  def velocity=(val)
    puts "setting velocity to #{val}"
    ...
  end

end

i = Instrument.new
i.osc_start(:input_port => 8000).join

When this example is run, the method velocity= is called on all instances of the Instrument class whenever OSC messages for the address /1/fader1 are received.

A couple of things to note here...

In order to enable OSC input, an input port must be specified for each instance. I've done that in this example using the osc_start method but there is also a method osc_input which just takes a port number. You can also add multiple input ports and share ports across various objects. (see example...)

Another thing to note is that val is, by default, the value of the first argument of the received OSC message. (OSC messages can have an unlimited number of arguments). You can modify which arg is used, or pass in all of them, by setting the :arg option on osc_receive.

You can also use osc_receive as an instance method. (see example...) However, more usefully, you can create a Hash map spec of osc_receive calls and pass it to an instance like this:

map = {
  "/1/fader1" => { 
    :translate => { :remote => 0..1, :local => 0..127 }
    :action => Proc.new { |instance, val| instance.pitch = val }
  }
}

class Instrument

  include OSCAccessible

  def pitch=(val)
    puts "setting pitch to #{val}"
    ...
  end

end

i = Instrument.new
i.osc_start(:map => map, :input_port => 8000).join

This kind of approach gives you more flexibility by decoupling the OSC spec for your object from the class -- like a controller and model in MVC.

Osc_receive has a few options:

:translate

There's another difference between those two examples: the :translate option means that val will be translated from a number between 0 to 1 to the analogous value between 0 and 127 before being passed to the code block. So for example if the first argument of the received OSC message is equal to 0.5, val will be equal to 63.

:thru

By setting the :thru option to true, any messages that are received for /1/fader1 are sent immediately to the output (as well as calling the :action block). For example, using the Instrument class from the last example:

map = {
  "/1/fader1" => { 
    :thru => true
    :translate => { :remote => 0..1, :local => 0..127 }
    :action => Proc.new { |instance, val| instance.pitch = val }
  }
}

i = Instrument.new
i.osc_start(:map => map, :input_port => 8000, :output => { :host => "192.168.1.9", :port => 9000 }).join

As you can see, I also specified an OSC output host and port for this example. If you're ever missing input or output port or host info, your object simply will not perform IO -- it won't raise any kind of exception.

osc_send

Osc_send gives you the ability to output arbitrary OSC messages. The first argument is the address of the message and any arguments after that are the content. Here is an example of our class definition from this first example with output added

class Instrument

  include OSCAccessible

  osc_receive("/1/fader1") do |instance, val|
    instance.velocity = val
    instance.osc_send("/velocity", val)
  end

  def velocity=(val)
    puts "setting velocity to #{val}"
    ...
  end

end

i = Instrument.new
i.osc_start(:map => map, :input_port => 8000, :output => { :host => "192.168.1.9", :port => 9000 }).join
i.osc_send("/greeting", "hi!")

In this example, I'm sending a message from both osc_receive's action block and in the main program block after i is instantiated.

osc_start

Osc_start starts all of the OSC servers that are connected to your objects. You must call it on an instance before osc_receive will function.

I'll be adding OSC Access to Diamond and coming up with a way to use it with MicroMIDI in the next few days. Thanks for reading.

http://github.com/arirusso/osc-access
Saturday, September 10, 2011

Generating Sysex Messages with MicroMIDI

Recently, the idea of converting MIDI Control Change messages to Sysex on the fly has come up a couple of times. One could use this to control a synth such as a Roland MKS or Yamaha DX7 that only accepts Sysex for control with a regular MIDI knob controller.

The following is a simplified example of doing this with MicroMIDI.
@i = UniMIDI::Input.use(:first)
@o = UniMIDI::Output.use(:first)
  
MIDI.using(@i, @o) do
  
  node :roland, :model_id => 0x42, :device_id => 0x10
  
  *@my_map =
    [0x40, 0x7F, 0x00],   
    [0x41, 0x7F, 0x00],
    [0x42, 0x7F, 0x00]
  
  receive :cc do |message|
      
    command @my_map[message.index - 1], message.value
      
  end
  
  join
  
end
Defining a Node

I won't get into too much background on Sysex but there are two concepts that one must understand in order to generate Sysex with MicroMIDI.

The first concept is what I call a Sysex Node: there are up to three bytes of data used in each Sysex message to identify the synth/module/destination/node/etc where the message is intended to be sent. This is not unlike the MIDI channel in a regular short message except that it's three bytes. Two of those bytes pinpoint the make and model of the synth while the third byte identifies the individual synth (device ID) in case you have multiple Yamaha DX7's or whatever the case.

MicroMIDI allows you to define these bytes as a sticky value using the node function.

Since I'm only using one synth for the entire example, I call the node function before setting up the input event to catch Control Change messages. (If you are using multiple synths and multiple events you would call node in each event block). The arguments represent the Manufacturer ID and the optional Model ID and Device ID. The Manufacturer can be referred to by a symbol (as above) or a string if its name is found in the manufacturer constants in midi.yml (by all means, add yours and do a pull request).

Now here's the annoying part: different brands and synth models use this Node data differently. For instance, I believe some devices don't understand messages with a model ID in them. In those cases just leave out whatever needs to be omitted from your messages. As I learn more about this myself, perhaps I can have this function streamline accepting the proper data for major synth types.

Command vs Request

The other concept to understand is that Sysex messages can (in theory) either be a command or request. This is pretty simple, and if you are creating a controller program you'll deal mostly in commands. In the case of the example above, we send a command
command @my_map[message.index - 1], message.value
When using the command function, the first argument is the sysex address and the second is the value to assign. The value can either be a number, as in this case, or an array of bytes. When making a request, the first argument is also the address but the second argument is the size of the response (in bytes) that you expect to receive
request 0x43, 43
If all else fails...

Due to the fact that Sysex hasn't had a truly concrete spec, some devices will use messages that don't really adhere to the command/request format. In those cases, you can just use the generic sysex command like this
sysex 0x1, 0x2, 0x3, 0x4
With no node specified, this will give you a message composed of
F0 01 02 03 04 F7
In other words, sysex will create a message and not perform any validation or add a checksum to it. You can still use node with these message-- it will append those bytes immediately after the F0 start byte as it would with a command or request.

tldr, Sysex is tricky to to objectify

If you'd like to gain a deeper understanding of how sysex messages work, this is a good tutorial (if Roland-centric) and I often referred back to it while creating MicroMIDI and the libraries that support it.

http://github.com/arirusso/micromidi

Next: More MicroMIDI Tricks

Wednesday, August 31, 2011

MicroMIDI: Shorthand

Most MicroMIDI methods and common symbol arguments have shorthand aliases intended to reduce keystrokes while live coding. The following is the example from the last post, re-done using only shorthand.
@i = UniMIDI::Input.use(:first)
@o = UniMIDI::Output.use(:first)

M(@i, @o) do

  tu :n

  rc :n { |m| tp(m, :oct, 1) if %w{C E G}.include?(m.note_name) }

  j

end

See the alias definitions here for the complete list.

http://github.com/arirusso/micromidi

Next: Generating Sysex Messages

MicroMIDI: Custom Events

While MicroMIDI has built-in functions such as transpose to process MIDI input, these functions may not always suit your purpose musically.

In those situations, you can bind your own input events.

Here is an example similar to the one in the last post except that only the notes C, E, and G are transposed
require "micromidi"

@input = UniMIDI::Input.use(:first)
@output = UniMIDI::Output.use(:first)

MIDI.using(@input, @output) do

  thru_except :note

  receive :note do |message|
    message.octave += 1 if %w{C E G}.include?(message.note_name)
    output message
  end

  join

end

For the sake of expressiveness, there are many permutations of each of these methods. I recommend reading the rdoc for the MicroMIDI Instructions classes to get a handle on what's possible.

http://github.com/arirusso/micromidi

Next: Shorthand with MicroMIDI

MicroMIDI: MIDI Thru and Processing

The simplest way to work with MIDI input in MicroMIDI is to use its built-in shortcuts for MIDI Thru and processor classes.

Here's an example where both kinds of shortcuts are used. An input and output are passed in, all messages that are received by the input are sent to the output (Thru) with the exception of notes which will be transposed up one octave before being sent to the output. The transpose function is an example of a processor.
@i = UniMIDI::Input.use(:first)
@o = UniMIDI::Output.use(:first)

MIDI.using(@i, @o) do

  thru_except :note { |msg| transpose(msg, :octave, 1) }

  join

end

http://github.com/arirusso/micromidi

Next: Custom Events with MicroMIDI

MicroMIDI: MIDI Messages and Output

Here's an example where MicroMIDI sends some MIDI messages to an output. (see an example here which explains selecting an output...)

require "micromidi"

@o = UniMIDI::Output.use(:first)

MIDI.using(@o) do

  note "C"
  off 

  cc 5, 120

  play "C3", 0.5

end 

Running this code sends the following to @o:

* note C2 (2 is the default octave)
* note-off for C2, since that was the last note sent
* sets controller number 5 to 120
* note C3, waits half of a second and then note-off for C3

By default, any time you call a method that returns a MIDI message object, it's automatically sent to any outputs that are passed in. You can toggle this feature by calling

output false

or

output true

You can also prevent only a single command from sending output by setting the output option:

note "c", :output => false
Sticky Values

If you work with MIDI often, you may have noticed that there was no mention of MIDI channel or velocity in the last example. Most of the time, sending a note-on or note-off message requires those values. In addition, for the first message I didn't specify what octave the note C should be.

In MicroMIDI, channel, velocity and octave are sticky values. When you open a MicroMIDI block, those values default to 0, 100 and 2 respectively. These sticky values will be used by any commands that need them. You can also pass a channel or velocity value to a command, temporarily overriding the sticky value. Providing the octave to a note ala note "c4" will override the sticky octave.

Here's an example where the sticky values are used, changed and overriden.

MIDI.using(@o) do

channel 1

  note "C4"
  off

  octave 5
  velocity 60

  note "E", :channel => 2
  off

  channel 3

  note "C3"
  off

end 

What winds up being sent to @o is:

* note C4 (channel 1, vel 100)
* note-off C4 (channel 1, vel 100)
* note E5 (channel 2, vel 60)
* note-off E5 (channel 2, vel 60)
* note C3 (channel 3, vel 60)
* note-off C3 (channel 3, vel 60)

http://github.com/arirusso/micromidi

Next: MIDI Thru and Processing with MicroMIDI

MicroMIDI: a Ruby DSL for MIDI

After a month of moving I'm finally getting back into some music projects. I've got some more flashy things in the works but first here is a Ruby DSL called MicroMIDI that brings all of the MIDI projects mentioned in this post together along with some new tricks in to a package a bit more suited for live coding and one-off scripts.

Being that it's an interface for four libraries, there's a lot of functionality. I break down each concept in the following posts:

http://github.com/arirusso/micromidi