Sunday, July 3, 2011

Live coding with Diamond

I've created a screencast video to show some basic live coding functionality with Diamond. In it, I use Diamond to send MIDI to a 2-voice modular synth and kick drum module.


(sound starts around 55 seconds in)

Here is a quick explanation of what was happening in the video.

Some people prefer to do live coding with a text editor, which is great because you can work a lot faster. However, for the sake of keeping this tutorial to the point, I'll assume you're working in IRB.

First, I'll start up IRB and set up an arpeggiator using the similar options as in the last post. That should look something like this:
require "diamond"

@output = UniMIDI::Output.use(:first)

arp = Diamond::Arpeggiator.new(175, :interval => 7, :midi => @output, :range => 4, :rate => 8)

chord = ["C3", "G3", "Bb3", "A4"]

arp << chord

arp.start
At that point we start hearing arpeggios. Since the arpeggiator is started in a background thread by default, and I can make changes to it while it plays.
arp.rate = 16
arp.gate = 20
arp.range = 3

# etc

In the video, I use the Arpeggiator#rest_every method to insert musical rests in to the arpeggio sequence. If I do
arp.rest_every(5)
notes become muted on every fifth beat.

Syncing multiple Arpeggiators

Another thing I do in the video is sync multiple arpeggiators to each other.

Assuming I still have that setup running, I'm going to add another arpeggiator.
arp2 = Diamond::Arpeggiator.new(138, :rate => 2, :output_channel => 1)

arp2 << ["C3", "G4", "A4"]
Because I used the :output_channel => 1 option, any notes coming from arp2 will be outputted on MIDI channel 1. Now I can sync this new arpeggiator to the old one -- the clock of the first arpeggiator, arp will drive arp2.
arp.sync(arp2)
By default, the sync will wait for the next time the arpeggiator pattern repeats to take hold. You can override this by passing in :now => true which will activate the sync on the next downbeat.
arp.sync(arp2, :now => true)
You can sync as many arpeggiators as you like.

Trouble getting this working in OSX? One solution here.

Thanks for reading


http://github.com/arirusso/diamond

Diamond, MIDI Arpeggiator in Ruby


Diamond is a MIDI arpeggiator in Ruby.

It features all of the classic functions of a MIDI arpeggiator plus the ability to live code, algorithmically generate and modify patterns, chain and sync instances and more


This is a quick screencast video I did while live coding Diamond. (read more about this here...)
(Sounds starts around 55 seconds in)

Getting started

Ruby 1.9.2 or JRuby in 1.9 mode are required.

It installs with a typical gem installation...
gem install diamond
Here is a very basic example to get started:
require "diamond"
First, select a MIDI output using unimidi. (more...)
@output = UniMIDI::Output.gets
The Arpeggiator has a number of optional parameters (more...). For the sake of keeping this demo simple, here is a straightforward setup:
opts = { 
  :gate => 90, 
  :range => 4, 
  :interval => 7,
  :midi => @output,
  :pattern => Diamond::Pattern["UpDown"],    
  :rate => 8
}
(read more about what these options mean)

Now create an Arpeggiator object, passing in a tempo value and the options chosen before. In this case the tempo will be 138 BPM
arp = Diamond::Arpeggiator.new(138, opts)
Of course, an Arpeggiator needs notes to work with. As you might expect, it's easy to use a MIDI input for that (see example). However, again for the sake of simplicity here's a chord in Ruby
chord = ["C3", "G3", "Bb3", "A4"]
Use Arpeggiator#add and Arpeggiator#remove to change the notes that the arpeggiator sees. (Arpeggiator#<< is the same as add)
arp.add(chord)
arp.add("C5")
arp << "A4"
By default, the arpeggiator will run in a background thread so if you are working in IRB this will allow you to live code, sync it other arpeggiators, or just run another foreground process. (To start in the foreground, just pass :focus => true to Arpeggiator#start)
arp.start
At that point, the arpeggiator starts playing. All of its options can be controlled on the on the fly.
arp.rate = 16
arp.gate = 20
arp.remove("C5", "A4")
Here are examples showing how to use some of Diamond's other features
Thanks for reading
http://github.com/arirusso/diamond

Monday, June 27, 2011

High-level realtime MIDI IO with Ruby

Update (9/8/2011): I've created another library that wraps all of the concepts of this post in a Ruby DSL and adds shorthand notation and some other fun things. Read about MicroMIDI here


Understandably, a few people have asked me for advice on how to input and output MIDI in a human friendly way with unimidi so I've decided to put together a quick tutorial. I'll be focusing on two gem libraries that I wrote: midi-message, which deals soley with MIDI message objects, and midi-eye, a library for reacting to MIDI input. Of course, it should be mentioned that there's no one way to do this with unimidi.  You can use whatever MIDI objects you like or create your own classes-- unimidi just deals in raw low-level bytes.  There are other libraries such as midilib that provide an intriguing alternative and could work pretty easily with unimidi.  Or one could get creative and go off with a totally unconventional approach as well. For the examples that follow, I'm using a MIDI input and output that I specify with unimidi.
require 'unimidi'

@input = UniMIDI::Input.use(:first)
@output = UniMIDI::Output.use(:first)

If you copy and paste these, they will just open the first MIDI devices available on your computer. You should determine which MIDI devices you want to use and edit these statements to suit your setup. (here's a blog post that goes into more detail on this)

Dealing with MIDI input using midi-eye

My preferred way of dealing with MIDI input is to react to arriving messages with an event listener.  Midi-eye makes this easy and its constructor accepts a unimidi input to attach to.  Here is an example that will react to all incoming messages in the same way by printing them to the screen

require 'midi-eye'

listener = MIDIEye::Listener.new(@input)
listener.on_message do |event|
  puts event[:timestamp]
  puts event[:message]
end

listener.start
Chances are if you're working with MIDI input that you will want to cherry-pick certain messages, or at least react in a different way depending on what type of message you've received eg. a note message, control change, etc.  To accomplish this, arguments can be passed to the Listener#listen_for method which will match against properties of the incoming messages
listener.listen_for(:class => [MIDIMessage::NoteOn, MIDIMessage::NoteOff]) do |event|

  # raise the note value by an octave
  event[:message].note += 12

  # send the altered note message to the output you chose earlier
  @output.puts(event[:message])

end

listener.start
In this example, I take all note messages (identified by their class), transpose them up one octave and send them to my MIDI output. You can add as many of these callbacks as you like, just keep calling Listener#listen_for. While that type of matching will be useful in a lot of cases, it is limited by the fact that it only matches positively against the properties and values you pass in. If you need more complex matching, I recommend putting a conditional statement within the callback.
listener.listen do |event|

  # is this a note above C3?
  if event[:message].respond_to?(:note) && event[:message].note > 48

    # if so, lower the note value by a fifth
    event[:message].note -= 7

  end

  # and send the message to the unimidi output
  @output.puts(event[:message])

end

listener.start

(listen and listen_for are actually the same method, I just think it looks cleaner to call listen when there is no matching happening)

Threading

Pass :background => true to listener.start to have the listener work only in a background thread. This will allow you to run other listeners or foreground threads while that particular listener is running in the background.

Output MIDI using midi-message

In those examples, I sent messages to an output-- but I didn't create those messages myself. The midi-message library allows you to create messages like that yourself in a flexible way.

require 'midi-message'
include MIDIMessage
Here are three different MIDI note-on messages created using three different methods.
messages = []

messages << NoteOn.new(0, 48, 64) # C3

messages << NoteOn["E3"].new(0, 100)

with(:channel => 0, :velocity => 100) do
  messages << note_on("G3")
end
With those message objects in hand, I pass each to UniMIDI::Output#puts the same way you saw earlier.
messages.each { |message| @output.puts(message) }
That's it... and it works the same for all types of MIDI messages including sysex. You can find some info on creating sysex messages here.

http://github.com/arirusso/midi-eye
http://github.com/arirusso/midi-message
http://github.com/arirusso/unimidi

Thursday, June 9, 2011

OSX: Unimidi, IAC and MIDI Patch Bay

Some quick instructions for routing MIDI between unimidi and other programs in OSX...

OSX (10.3 and above) has the ability built in to route MIDI between programs using something called Inter-Application Communication (IAC). IAC allows you to create a pair of virtual MIDI devices (an input and an output) that applications will see as though they are usual MIDI hardware devices. When you send MIDI instructions to the output, they show up at the input. Therefore, you can send MIDI to the output using one program and use the input in another program to receive the data.

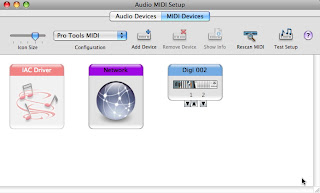
You can control the IAC settings using the built-in Audio MIDI Setup applications in the utilities folder. That program allows you to create, edit and delete these virtual device pairs.


When Audio MIDI Setup is loaded you should see the window shown above. If you don't, select Show MIDI Window from the Window menu.

Double-click the IAC Driver icon. Click More Information if the Ports menu is not showing. Make sure that there is at least one port listed -- this represents a single pair of virtual devices.

When working with Ruby, select the IAC Driver from the list of unimidi inputs or outputs that corresponds to the port that you've created. For example, the first IAC Driver output in unimidi will correspond to the output for the first set of ports in Audio MIDI Setup.

You can list your unimidi devices by using unimidi list at the command line or using UniMIDI::Device.all in Ruby.

Once you have these concepts down, you also have the option of using MIDI Patch Bay for more complex routing and filtering.

Joe Le Brech made a video of using MIDI Patch Bay and IAC to send notes to GarageBand


He wrapped all of his Ruby code in a script called output.rb so you really can't see exactly what's going on the Ruby end of things...but it should give you a general idea of how this works

Tuesday, June 7, 2011

Unimidi: Platform independent realtime MIDI IO in Ruby

Unimidi is a universal Ruby library for realtime MIDI IO.

It currently works with MRI 1.9.2 on Linux, OSX, Windows/cygwin and under JRuby in 1.9 mode on any platform.

gem install unimidi

No compilation is required, install the gem and start playing.

Unimidi deals in raw bytes rather than high level message objects with the intention of allowing people to use whichever message objects or helpers they choose. There's a few libraries out there for that, including one by me.

Under the hood, unimidi is essentially linkage to a set of platform specific C bindings (that use ruby-ffi).  Or in the case of JRuby, some code that wraps javax.sound.   These platform specific libraries are broken out in to their own gems and the appropriate one should install automatically when the unimidi gem is installed. In unusual cases where your platform isn't recognized, all of those gems will be installed.  You can see which library goes with which platform on the unimidi github page. It is possible to use those gems on their own, but currently none of them contain any features that aren't also made available through unimidi.

Here's a couple of quick examples to get started

Sending notes to a MIDI output

First, load unimidi and then define a set of note values and a duration value for how long the notes will be held out.

require 'unimidi'

notes = [36, 40, 43, 48, 52, 55, 60, 64, 67] # C E G arpeggios
duration = 0.1

Next, select an output.  To list all available outputs, you can do unimidi list from the command line or UniMIDI::Device.list in irb.  In this case, the first output is selected and enabled. (here is another post with more information about selecting a device)

output = UniMIDI::Output.open(:first)

Now open that output.  Passing a block to open is optional but it ensures that the device is closed when the program is finished.  This can alleviate some headaches when multitasking MIDI/audio programs.  Note that it's also possible to select, open and use multiple inputs and outputs concurrently.

output.open do |output|

  notes.each do |note|
    output.puts(0x90, note, 100) # note on message
    sleep(duration)  # wait
    output.puts(0x80, note, 100) # note off message
  end

end

Output#puts can also be used for sysex messages in the same manner as note messages, a la:
output.puts(0xF0, 0x41, 0x10, 0x42, 0x12, 0x40, 0x00, 0x7F, 0x00, 0x41, 0xF7)
Note that some OS's will silently reject invalid sysex or short messages.

You can also Output#puts a string of hex bytes if you prefer to work that way
output.puts("904040")
output.puts("F04110421240007F41F7")

Working with input

Input can be collected two ways. First, unimidi has a method Input#gets which waits for input before returning. It works exactly the way Ruby's $stdin.gets works when waiting for keyboard input.

Here is a demonstration of Input#gets

Select an input and open it...

input = UniMIDI::Input.first
input.open do |input|

  $stdout.puts "send some MIDI to your input now..."

  loop do
    m = input.gets
    $stdout.puts(m)
  end

end

When MIDI input is received, you'll see inspected Hash objects like this:

{ :data => [144, 60, 100], :timestamp => 1024 }

In this case [144, 60, 100] is a note-on message for channel 0, note C4 (aka 60), with velocity 100.  The timestamp is the number of milliseconds since the input was opened.

The other more advanced way to receive input is by polling Input#buffer manually.  As new messages are received, they are added to that buffer array.  I normally use this with a pointer to keep track of the index of the last message seen.  Polling this way would for example, allow you to create your own background thread to collect input while your program does other things.  The library Topaz, which I wrote about in my last post, collects clock messages from unimidi that way.

Your computer should be able to receive data with 1-2 millisecond accuracy

http://github.com/arirusso/unimidi

Thursday, May 26, 2011

Topaz: MIDI syncable tempo in Ruby

Topaz is a Ruby based music tempo generator / analyzer 

gem install midi-topaz

It gives you the ability to time events to a given rate in beats per minute
("sequencer" is some kind of imagined sequencer)

@tempo = Topaz::Tempo.new(130) { sequencer.step! }

or synchronize them to incoming MIDI clock messages

@input = UniMIDI::Input.first.open # a midi input

@tempo = Topaz::Tempo.new(@input) { sequencer.step! }

Topaz can also act as a MIDI master clock.  If a MIDI output object is passed to Topaz, MIDI start/stop/clock signals will automatically be sent to that output at the appropriate time

@output = UniMIDI::Output.first.open # a midi output

@tempo = Topaz::Tempo.new(120, :midi => @output) { sequencer.step! }

an input can be used along with multiple outputs simultaneously

@tempo = Topaz::Tempo.new(@input, :midi => [@output1, @output2]) { sequencer.step! }

once everything is all set, start the clock

@tempo.start

Note that if you are syncing to external clock, nothing will happen until Topaz receives a start or clock message

Other stuff to note...

Whether or not you're using an internal or external clock source, the event block will be called at quarter note intervals by default. If you wish to change this, set the option :interval.  In this case, 16th notes will occur at 138 beats per minute where one beat equals one quarter note

@tempo = Topaz::Tempo.new(138, :interval => 16) { sequencer.step! }

View the current tempo, which is calculated by Topaz if you're syncing to an external source.
(this feature is in progress. you might receive some unreliable values - 5/26/2011)

@tempo.tempo
    => 132.422000

Run the generator in a background thread by passing :background => true to Tempo#start

@tempo.start(:background => true)

@tempo.join # join later if you want

Pass a block in that will stop the clock when it evaluates to true

@tempo.stop_when { @i.eql?(20) }

http://github.com/arirusso/topaz

Wednesday, May 25, 2011

bloggins

HELLO

I'm working on some music programming/performance tools that I'm going to post here

My github page has the progress so far

http://github.com/arirusso

I'll be going back and writing about those projects as well as the new stuff as it's ready